611 Dust Shoe
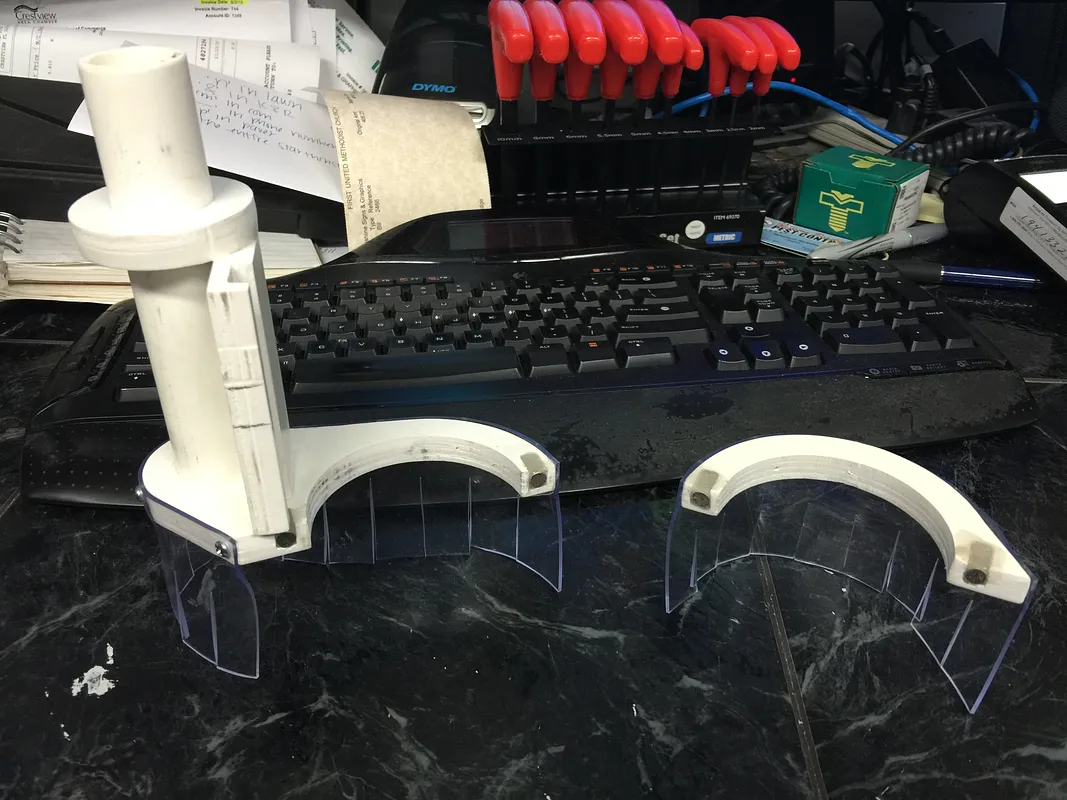

Instructions
Materials
10MM PVC or whatever material you want to use 1/4" dia. x 3/8" long Neodymium Magnets "K&J Magnets":https://www.kjmagnetics.com/proddetail.asp?prod=D46-N52 Clear Vinyl Door Stripping "McMaster Carr":http://www.mcmaster.com/#catalog/121/2854/=104xipn 5 minute Epoxy No.6 x 1/4" Sheet Metal Screws M4x.7 x 14 Socket Head Cap Screw
Estimated time: 1 minutes
Assembly
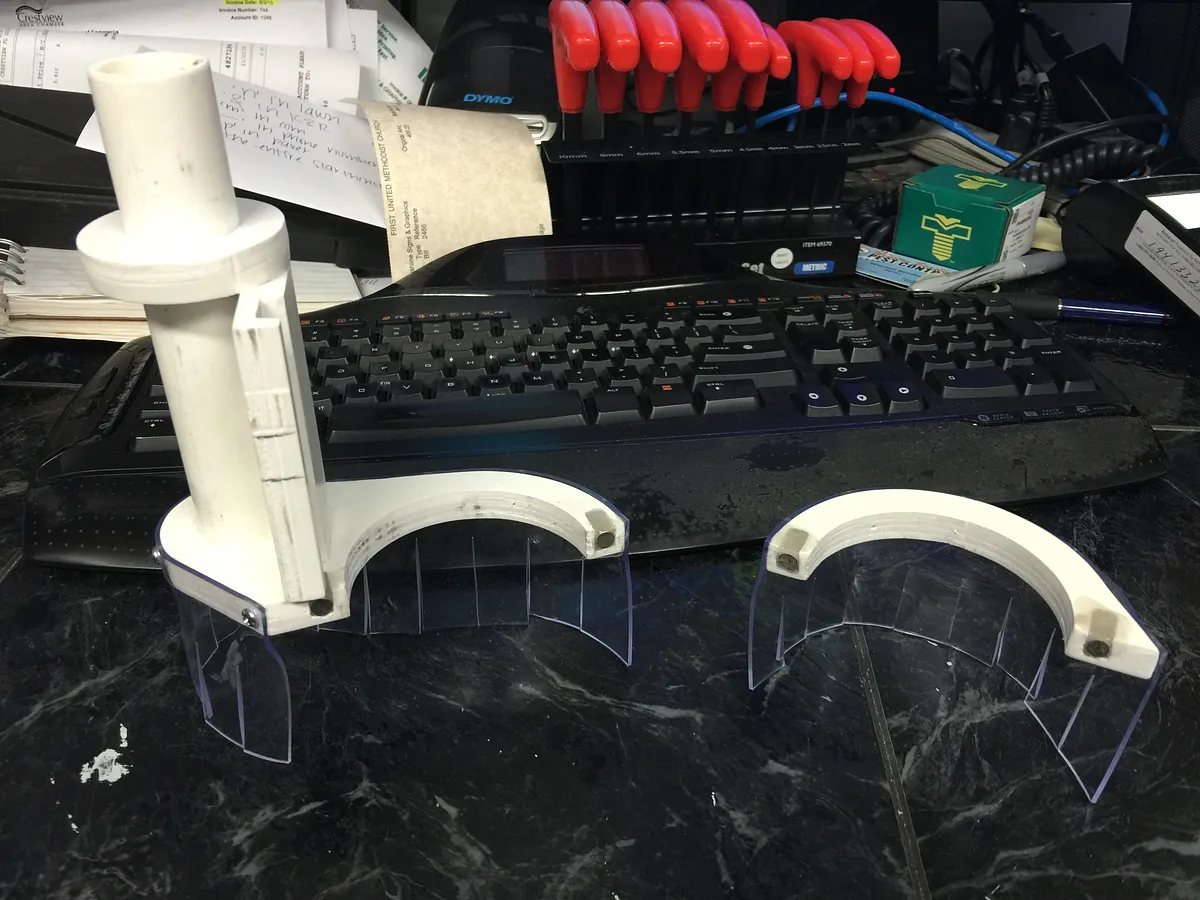
The first thing you need to do is epoxy the magnets in place. Make sure you put the magnets in the correct way so that they are attracted to each other. If not they will not stick together. (Don't ask how I know). Mix up your epoxy per the instructions and place a small amount in each of the magnet pockets (enough so some will squeeze out when you put the magnets in). Put the magnets in making sure they are flush with the edge of the shoe. Now fill in the top of the magnets with more epoxy. Try to keep the matting surfaces clean. I used 5 minute epoxy so of course it took about 20 minutes to set.
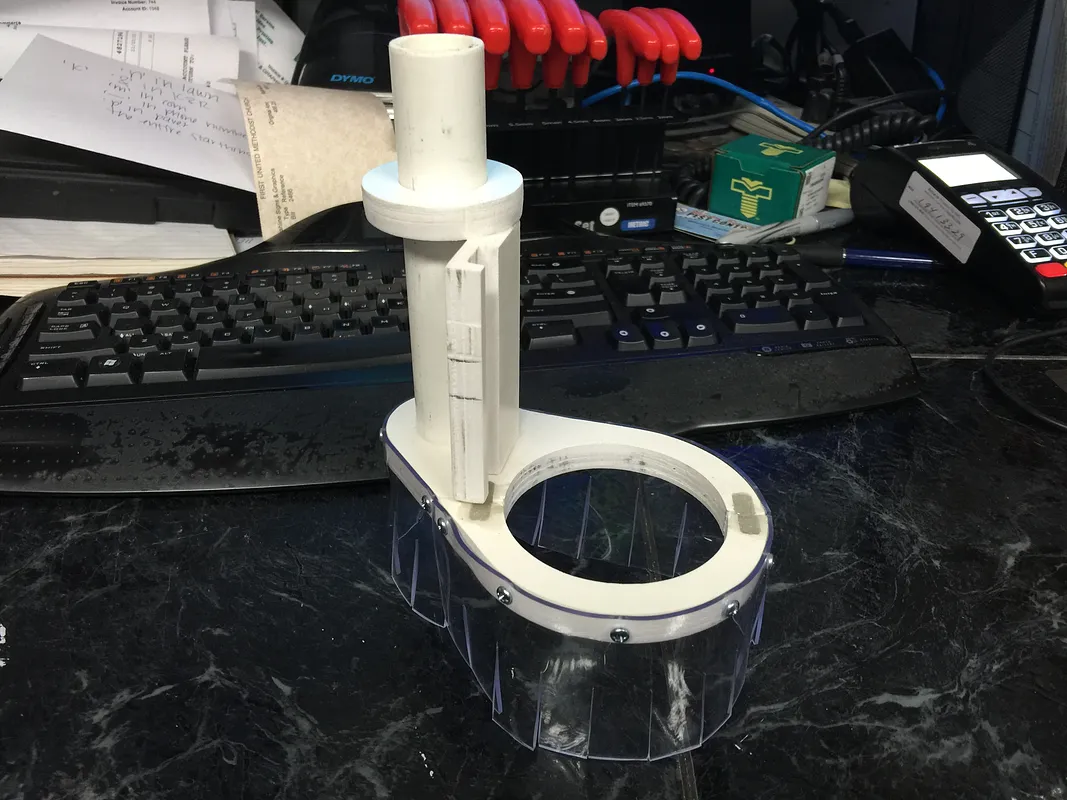
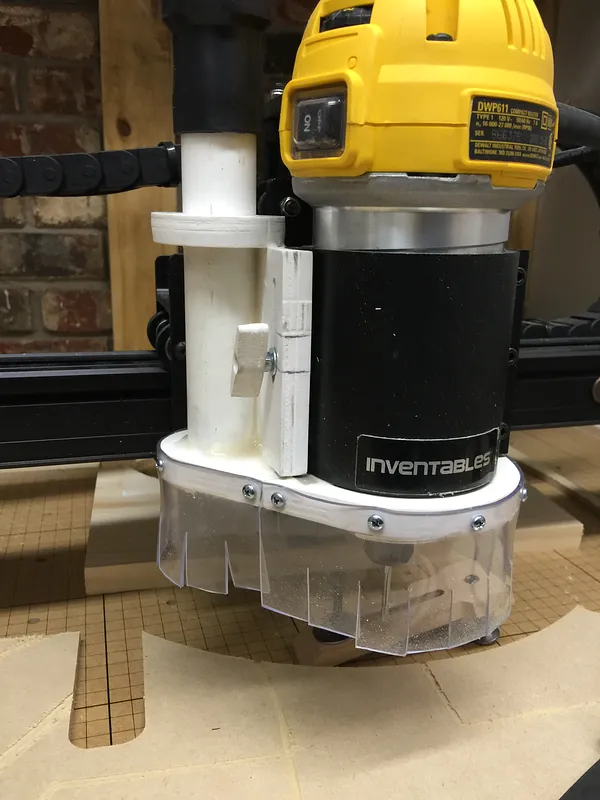
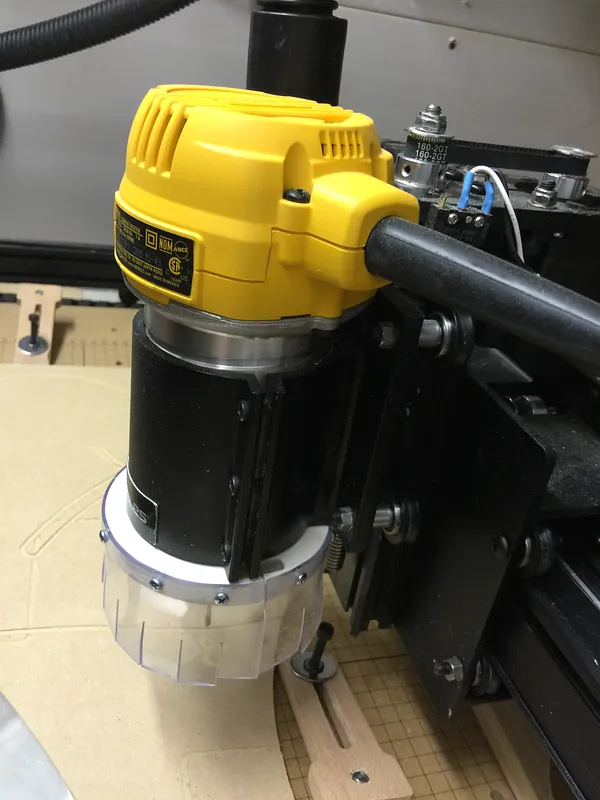
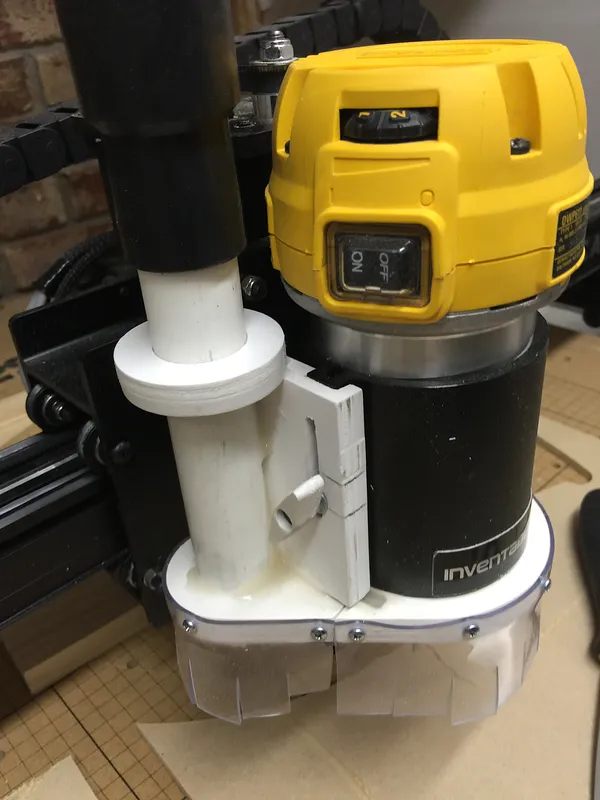
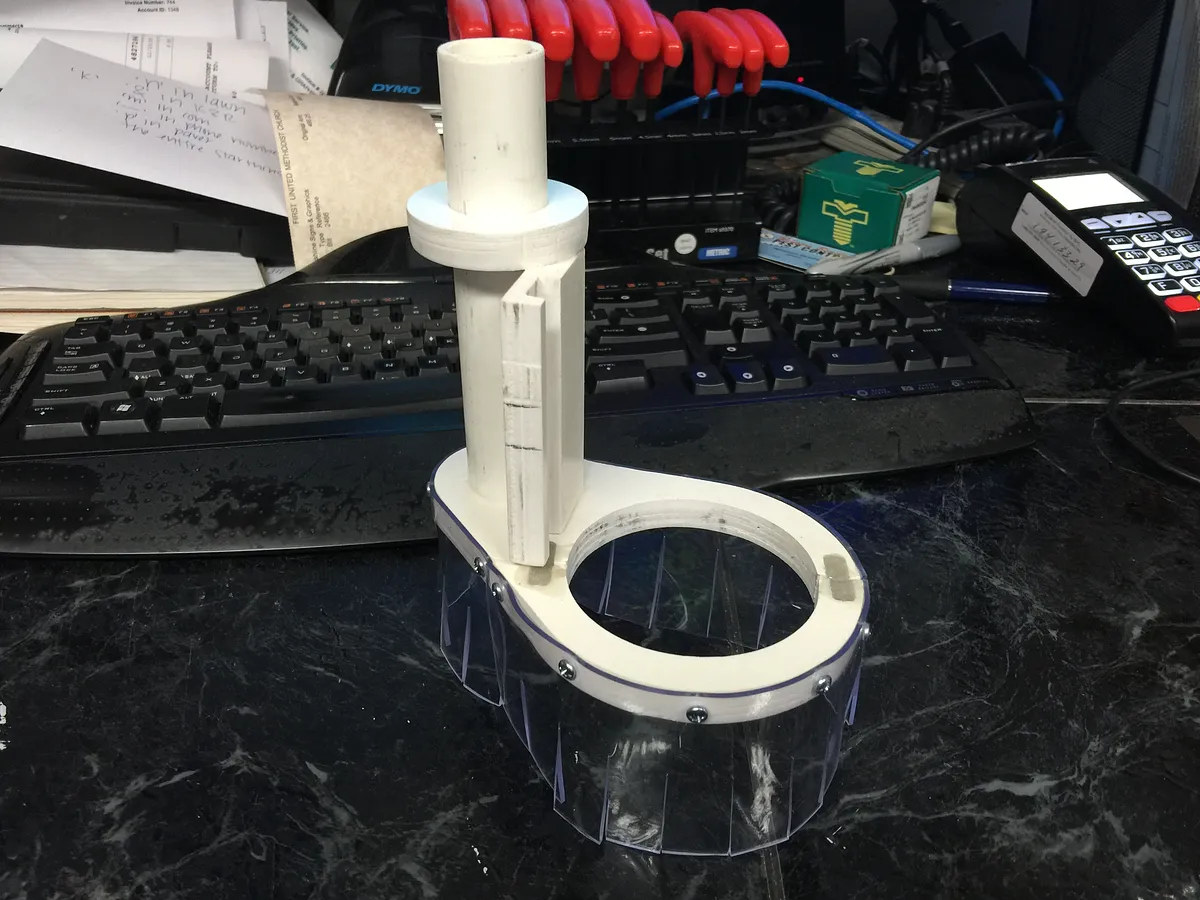
Once the epoxy is dry enough to handle you can continue to the next step. The best way to assemble the shoe is on the machine. Start by attaching the adjustable mounting bracket to the accessory hole on the side of the spindle mount. Make sure the bottom is flush with the bottom of the spindle mount. No place the PVC pipe in the large part of the dust shoe, (it should fit snug and not need any glue at this time). Place the dust shoe around the spindle body with the PVC pipe up against the adjustable mount bracket. Now slide the ring down over the PVC until it rest on top of the mounting bracket. Once you have everything fit properly I used a little superglue to temporary attach the pieces together. Now very carefully remove the screw holding the dust shoe on and remove the dust shoe. You can now use epoxy to finish bonding everything together.
After your epoxy has dried you can now attach the vinyl skirt. I attached it in one piece and cut the slits in it afterwards. I cut mine down to 2.75" tall but you will have to measure your machine to decide what will work best for you. Always error to the long side, it is easy to trim down on the dust shoe. I ended up with a final height of 2". Use the#6 sheet metal screws about 1" apart to attach the skirt around the entire dust shoe and then cut slits in the skirt where the dust shoe splits apart. I put a drop of super glue at the ends of the skirt where you can't put a screw due to the magnets. Now cut slits every 1/2" up about half of the height of the vinyl.
You are now ready to use you new dust shoe.
Estimated time: 25 minutes
Comments
This looks perfect! I'm excited to carve it out tonight! Thanks, Stuart!
Ryan Parish · December 08, 2015
I have ordered one of these: ebay.com/itm/262139212783?_trksid=p2057872.m2749.… If anyone needs a piece, I will have lots extra. Kick me a few bucks so I can cover my costs and shipping.
Justin Eastman · December 09, 2015
Where can you get PVC in sheets like that?
Justin Eastman · December 09, 2015
Other people have mentioned getting similar material called "Cellular PVC" from the big box stores. I by form a sign supplier since I'm in the sign business. MDF or plywood would work just as good, I just have lots of PVC laying around.
Stuart Campbell · December 09, 2015
Thanks. I think I can find it in the trim section of most home stores. I have MDF but I am concerned about putting any extra weight on the x-axis.
Justin Eastman · December 09, 2015
Cool!
Jeff Allram · December 18, 2015
I have everything cut. What size PVC pipe did you use.
Rodney Beltz · December 23, 2015
I used 3/4" PVC pipe. That is what fit my vacuum hose.
Stuart Campbell · December 23, 2015
Hello , I've got a little question: In the easel project, it says that the material thickness is 10.3mm, but you instruct to use a 10mm (1cm) pvc sheet. Why there is this difference? Thanks,
Martin · February 25, 2016
The material is sold as 10mm. The 10.3 is the actual measurement of the material when I measured it. You should measure the material that you are using and change the thickness in Easel to match what you actually have.
Stuart Campbell · February 25, 2016
Okey. Perfect. Another question that I have is: The PVC that you used is also called expanded pvc or foam pvc? Is that the same? I am new in all this material stuff and I am a bit lost, to be honest. Thanks,
Martin · February 25, 2016
I think they are the same. I heard someone also call it cellular pvc. You could also use MDF or plywood instead of the PVC.
Stuart Campbell · February 25, 2016
Okey, I will try. I think (if I am not mistaken), in one of the posts, you mentioned something about an extra "piece" that you added to divert the air flow in a better way. Is this also in this design? Thanks,
Martin · February 25, 2016
I found soft pvc sheets of 0.2 mm (0,007''). Do you think this is suitable or it would be too thin and would get sucked in by the vacuum? Thanks,
Martin · February 25, 2016
That would not work at all.
Stuart Campbell · February 25, 2016
and 2mm 0.07'' would work?
Martin · February 25, 2016
No I would try to be as close to 10mm, .39 as you can. 2mm would not be strong enough.
Stuart Campbell · February 25, 2016
I meant it for the "aloha-skirt". Sorry if I was not specific enough. It is also for "doors", but it's a bit thinner than what you used. It is this one: modulor.de/en/soft-pvc-transparent-film-colourles…
Martin · February 26, 2016
For the strong 10mm pieces I found 10mm Clear Acrylic GS that can be carved and does not melt, and also 10mm PVC foam. So I can try both. Acrylic should work as well no? :)
Martin · February 26, 2016
Yes either the PVC or Acrylic should work fine. For the skirt I would try the 2mm to prevent it from being sucked in by the vacuum. Let me know how it turns out.
Stuart Campbell · February 26, 2016
Have you run into any issues where the vinyl folds inward and hits the bit?
Ryan CannonPro · June 07, 2016
No but I have actually trimmed mine down to about 2 inches or so.
Stuart Campbell · June 08, 2016
I want to do this in 3/4" HPDE, Do you think that would be a problem?
Matthew J. Martin Sr. · June 24, 2016
I think it will work.
Stuart Campbell · June 24, 2016
3/4 HDPE would probably work BUT it is a lot heavier and move expensive compared to the PVC. Also it's hard to get things to stick to it(for gluing in the magnets), but epoxy might but I would doubt it.
Chad Shelby · September 04, 2016
I had some leftover vinyl flooring we glued together to make thick enough material to use. Worked Perfectly. Cut up a clear plastic bottle to make part of the dust skirt, and then used duct tape to make the bottom half of the skirt. Best dust shoe EVER!!!
William Dunlap · September 06, 2016
Downloaded you dust boot dxf tonight. Will cut it out Saturday using 1/2" burch. Great looking project! I do have a question about the two small tombstone shaped pieces. What are they for and where do they go?
Gregory Presnell · September 07, 2016
There should only be one of them but it is to deflect the suction toward the router but it is not needed. I never used it on mine.
Stuart Campbell · September 08, 2016
fail open dxf file in Inkscape err msg: Traceback (most recent call last) inkex.errormsg(_('%d ENTITIES of type POLYLINE encountered and ignored. Please try to convert to Release 13 format using QCad.') % polylines) NameError: name '_' is not defined
Keith Selbo · March 03, 2017
any ideas?
Keith Selbo · March 03, 2017
OK, I loaded dxf into a drafting program that could save it as a rel. 14 dxf. Inkscape took it, But there is no depth of cut information. also from photo I see there is hardware not listed in BOM. Looks like lock nut and maybe washer.
Keith Selbo · March 03, 2017
The only hardware you need are the screws to attach the skirt and M3 to attach to the side of the router mount. I used a M3 screw and a lock nut to make the knob so I could take it on and off quickly.
Stuart Campbell · March 03, 2017
Thanks Stuart. There is a part in the drawing (just above knob that I can't find in the photo's. What does it do? Where does it go?
Keith Selbo · March 03, 2017
Unfortunately I can't find 10mm PVC anywhere.
Pyrex238 · March 04, 2017
does it fit for Dewalt 26200 aswell?
Mats Heed · June 21, 2017
Sorry I do not know. If it uses the 611 mount then it should.
Stuart Campbell · June 21, 2017
Not able to open as an easel project?
John White · July 25, 2017
I downloaded the dxf file and imported it to Aspire to do some modifications, but the drawing is out of scale. It's really, really, really small. So, I wonder if you could do another export from the program you used to make this, and verify that the scale is correct (1:1). Thanks!
Bjørn-Ove Kiil · August 04, 2017
Hello The "Open in Easel" link does not seem to be working. It just goes to a blank page thanks Craig
Craig McMahon · August 27, 2017
anyone manage to get this in Easel?
Matt Rocks · October 27, 2017
The project seems to not be available in Easel any more. It would be really handy for novices like me if it could be made available again as I am just starting and havent got into .dxf files yet. Looks like a great shoe!
mark m · November 08, 2017
Sorry but I guess I had deleted this project by mistake. It is back up and working now.
Stuart Campbell · November 08, 2017
Thats brilliant thanks very much!
mark m · November 10, 2017
In your comment above you say you used an M3 and lock nut... But the materials states M4. I'm going to pick some up, but what is the proper screw size?!
Scott Koopmann · January 08, 2019
Love this design, but I have one question that no one has asked or seemed concerned with...What about the spindle lock button? How do you get to it. It looks to me that the button would be covered by the 10mm base plate? Any insight or pictures showing the button would be awesome. Thanks
Rhett Unruh · January 15, 2019
Rhett - My router is rotated so that when the front part of the dust shoe is off the spindle lock button is exposed.
Stuart Campbell · January 16, 2019
Scott Koopmann - To be honest with you I don't remember which size is correct. It is what ever fit the holes on the left side of the router mount.
Stuart Campbell · January 16, 2019
getting ready to build this. What thickness did you get for the Clear Vinyl Door Stripping?
Cody Grinolds · December 20, 2020