Make a cordless-drill station

Draw a two-drill storage station in Easel, sizing each hanging slot between the drill’s neck and body and leaving a shelf for the factory charger.

See the finished builds

Start from a blank workpiece

Design your own cordless-drill station

The animation below shows drawing a two-drill wall station from scratch in Easel. A plywood back, two sides and two shelves form the cabinet: open lower slots support the drills and the upper shelf carries an unmodified factory charger. Add separate wood screws and suitable wall anchors. Assume 30 mm drill necks, shoulders at least 50 mm wide and batteries up to 90 × 110 mm across and front-to-back, centered on each neck. Allow at most 170 mm of tool above the supporting shelf, plus 20 mm upward lift for removal, and 160 mm below it. For the charger, assume a 200 × 170 × 75 mm body inside a 240 × 210 × 95 mm cable-and-ventilation envelope. These are untested references. In 18 mm plywood, draw a 300 × 300 mm back, two 230 × 300 mm sides, a 264 × 230 mm upper shelf and a 300 × 230 mm lower shelf. Cut 18 mm-wide, 9 mm-deep end rabbets in the lower shelf. With its underside at height zero, seat the sides at height 9 mm and mount the upper shelf with its underside at 249 mm. This leaves 231 mm above the lower shelf’s 18 mm-high supporting face: the 190 mm tool-and-lift envelope has 41 mm spare. Keep at least 180 mm clear below the lower shelf for the hanging tools. Place two 36 × 120 mm slots from the front edge on 132 mm centers, leaving a 110 mm rear web. Each neck has 6 mm clearance and its 50 mm shoulders bear 7 mm on each side. The reference batteries have 42 mm between them and 55 mm rear clearance. The upper shelf has 24 mm total width and 20 mm depth beyond the charger envelope, with open space above. Draw the upper-shelf fixing guides through the side faces at 249 mm above each side’s bottom and 40 and 190 mm from its rear edge; their assembled height is 258 mm, centered in the upper shelf’s end edges. Lower-shelf guides lie 9 and 291 mm across its width at the same depths, entering the side bottoms. The back covers the rear edges: its fixing guides are 9 and 291 mm across, 40 and 280 mm above its bottom, entering the side rear edges. Separate 5 mm wall-fixing holes serve installation, not panel joinery. Remove tabs, clamp the cabinet at these elevations and drill 2 mm receiving-edge pilots through the 3.5 mm face guides for 3 × 40 mm wood screws. Countersink the lower screws flush and keep their tips contained. Before use, check a mock-up with the actual tools and charger, loaded wall fixing and the charger manufacturer’s ventilation requirements; no charging or load test is represented.

Recorded in the Easel editor, playing at 4× real speed.

A plywood cabinet and an MDF charging station

Nate adapts a plywood organizer with dividers and shelves; Billy’s MDF layout uses recessed joints and separate drill-support inserts. Match your drill necks to the supports and preserve the shelf space needed by the chargers.

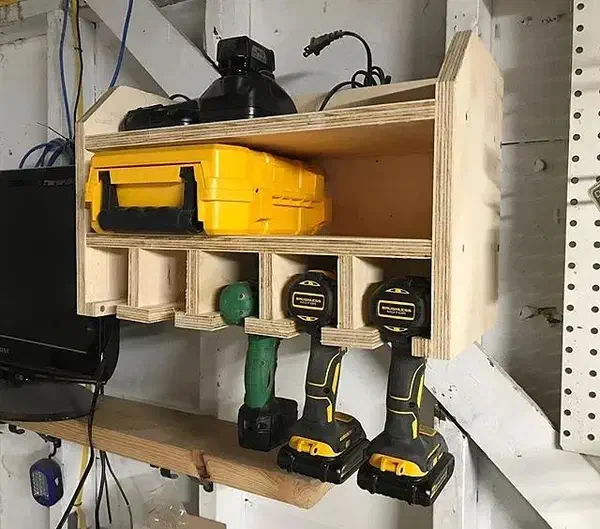
A finished plywood drill-storage cabinet holding three cordless drills and chargers Cordless Drill Stationby Nate Fanaro

Cordless Drill Station

Nate’s first native workpiece contains an 18 × 12.5-inch back panel and two 12.5 × 10-inch side panels. The second contains two 18 × 9.25-inch shelf panels, eight smaller rectangular entries and two narrow strips. He cuts the sloping top corner separately with a circular saw. His linked plans show how the drawers are built: Amy’s Her Tool Belt Step 3 describes cutting dadoes for the drawer bottom, using pocket joints or predrilled holes to join the sides, dry-fitting and trimming the drawer, then gluing and screwing it together and adding a pull. The plan also specifies 3-inch divider gaps and 4-inch clear shelf gaps. Supply the plan’s screws, wood glue and drawer pull separately; check your drill neck against its 1 1/2-inch handle reference before changing the holder widths.

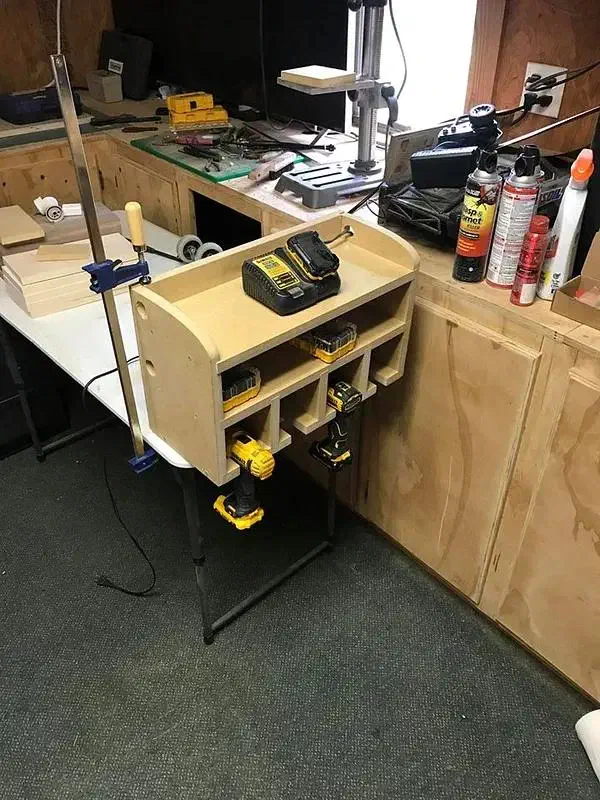
Billy R Falgout’s completed MDF drill charging station installed in a workshop Drill Charging Stationby Billy R Falgout

Drill Charging Station

Billy makes his charging station from 3/4-inch MDF on a stock X-Carve. The five native workpieces are labeled Sides, Back, Shelves, Drill Supports and Drill Support Inserts. The side panels and back form the cabinet, the shelves carry the chargers, and the separate supports and inserts form the hanging drill bays. The layouts include recessed joints and through-cut parts. Measure your MDF and your drills before adapting the file. Dry-fit the panels, shelves and supports before fastening the cabinet; supply adhesive, any reinforcing screws and wall fixings suited to the loaded station separately. Keep the factory chargers and their original cables.

See more drill station search results →

Nate’s next-build suggestion: bottom-shelf rabbets

Log in to post a question in the project discussion; replies are not guaranteed.

Nate’s next-build suggestion: bottom-shelf rabbets

Nate Fanaro says he would try rabbets on the bottom shelf next time to keep the parts aligned. He describes this as a proposed change for his next build.

Project notes by Nate Fanaro: read the source.

From Cordless Drill Station by Nate Fanaro.

Ask a question

Start creating with your CNC

Create your free Easel account and connect your machine in minutes.